
Building an identity server that supports OAuth 2.0 and OpenID Connect with ASP.NET Core and IdentityServer4 - Part 1
Modern systems comprise of many independent parts linked together – APIs, web clients, mobile clients and other connected devices. All these layers need to communicate with each other and they should do it in a very secure way. Each layer in the system has to protect its resources by implementing authentication and/or authorization – often against the same user store. To avoid unnecessary duplication of this function it is therefore advised to outsource security functions to a standalone security token service or identity server. That’s where IdentityServer4 comes in. In this mini series we are going to take a look at how to build a security token service that supports OpenID Connect and OAuth 2.0 protocols using IdentityServer4.
What is IdentityServer4
IdentityServer4 is an OpenID Connect and OAuth 2.0 framework for ASP.NET Core that enables the following, among others:
- Authentication as a service: It provides centralized login and workflow for all of your applications (web, mobile, services, native).
- Single Sign-in / Sign-out over multiple application types.
- Access control for APIs: It issues access tokens for various types of clients – server-to-server, web applications, SPAs etc.
IdentityServer4 is a middleware that allows you to build a centralized security system by adding the spec compliant OpenID Connect and OAuth 2.0 endpoints to an ASP.NET Core application. For detailed information on IdentityServer4 you can check out their docs.
What we are going to build
In this series we are going to build a simple system that comprises of many layers – a REST API, a console client and an MVC client. All these layers will need to secure their resources. Instead of each layer in our system implementing its own security we outsource this functionality to a standalone layer. This layer, which uses the IdentityServer4 middleware, will be be responsible for the following:
- protecting resources
- authenticating users
- issueing identity and access tokens to clients
- validating tokens
This is what most big organisations do. For instance, to authenticate into any Google service you have to use one service – accounts.google.com. This has many advantages including helping teams focus on the core functionality of their products instead of dealing with authentication and authorization.
Let’s get started
Create an empty solution and add a new empty web application called Server. This is going to be our identity server that will be responsible for securing all the other layers in the system. Add the IdentityServer4 NuGet package to your Server project and create a static class called Configuration where we will add the configuration data for our server. Inside the Configuration class add the following code:
// Configuration.cs

using IdentityModel;
using IdentityServer4.Models;
using System;
using System.Collections.Generic;
using System.Linq;
using System.Threading.Tasks;

namespace Server
{
    public static class Configuration
    {

        public static IEnumerable<ApiResource> Apis =>
            new List<ApiResource>
            {
                new ApiResource("dummy_api", "Dummy API")
            };

        public static IEnumerable<Client> Clients =>
            new List<Client>
            {
                new Client
                {
                    ClientId = "console_app",
                    ClientSecrets = { new Secret("console_app_secret".ToSha256())},
                    AllowedGrantTypes = GrantTypes.ClientCredentials,
                    AllowedScopes = { "dummy_api" }
                }
            };
    }
}
Let’s talk a little bit about what’s inside our configuration file. We have two lists – one for ApiResources and another for Clients. Let’s define these two. An API is anything in your system that you want to protect. In our case we want to protect a simple REST API with an ID dummy_api. Each resource needs to have a unique ID. A client is an application that will want to access our protected resources. In our case we have one client so far, with ID console_app. This client has no interactive user so we are going to authenticate it using a client secret. The AllowedScopes property lists the protected resources that this client is allowed to access. Our console client has access to our dummy API.
Let’s now go to Startup.cs and configure IdentityServer. Add the following to code inside your Startup.cs file:
// Startup.cs

using Microsoft.AspNetCore.Builder;
using Microsoft.AspNetCore.Hosting;
using Microsoft.AspNetCore.Http;
using Microsoft.Extensions.DependencyInjection;
using Microsoft.Extensions.Hosting;

namespace Server
{
    public class Startup
    {

        public void ConfigureServices(IServiceCollection services)
        {
            services.AddIdentityServer()
                .AddInMemoryApiResources(Configuration.Apis)
                .AddInMemoryClients(Configuration.Clients)
                .AddDeveloperSigningCredential();

            services.AddControllersWithViews();

        }


        public void Configure(IApplicationBuilder app, IWebHostEnvironment env)
        {
            if (env.IsDevelopment())
            {
                app.UseDeveloperExceptionPage();
            }

            app.UseRouting();

            app.UseIdentityServer();


            app.UseEndpoints(endpoints =>
            {
                endpoints.MapDefaultControllerRoute();
            });
        }
    }
}
We are done with the basic configuration of our IdentityServer application. Now run the project and navigate to http://localhost:[PORT_HERE]/.well-known/openid-configuration. You will see a discovery document, which is a standard endpoint in all identity servers. This discovery document will be used by your clients and APIs to download the necessary configuration data. When you navigate to the endpoint above you will see something like this:
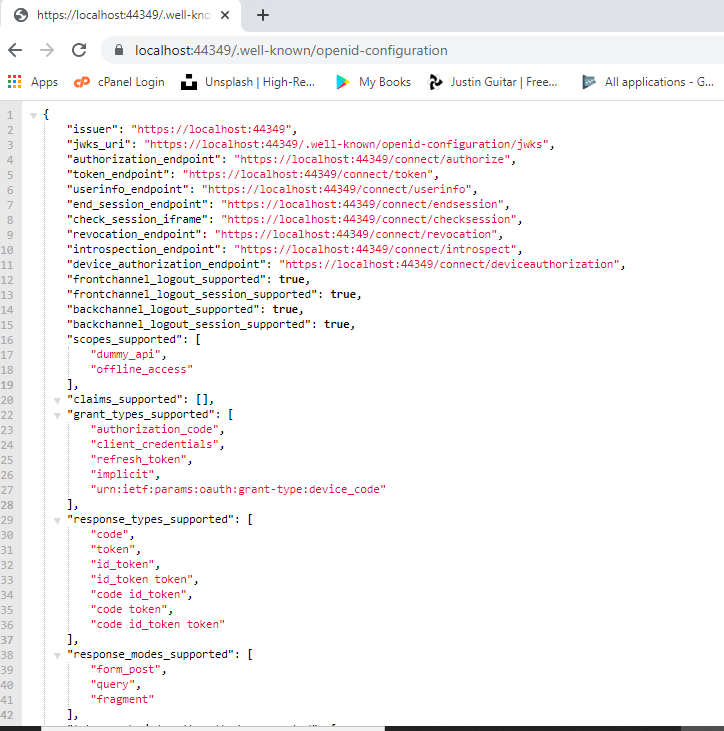
Just to confirm that this discovery document is standard to all identity servers, you can check out the Google Accounts discovery document on this link: https://accounts.google.com/.well-known/openid-configuration
Conclusion
In this post we spoke about how IdentityServer4 can be used to build an identity server that will be responsible for protecting resources in a large system as well as managing authentication and authorization to those resources. We then built the identity server and added some basic configuration. The source code for this series can be founf on GitHub. In the next post we will add an API resource and a client to our system. Once again, thanks for reading.
Comments