
In the previous post, I introduced NServiceBus and its core conceptions. In this post, I will take you through building your first distributed system using NServiceBus. For the sake of brevity, I will not include all the code in this post. If you want the complete code, you can get it on my GitHub.
At the end of the post, you will have created your first distributed system using NServiceBus. Let’s get started.
System Overview
The demo system consists of 3 services – the Sender, the Receiver, and the Spy. Pardon my poor naming skills ![]() . Figure 1 below shows the overview of the system we’re going to build.
. Figure 1 below shows the overview of the system we’re going to build.

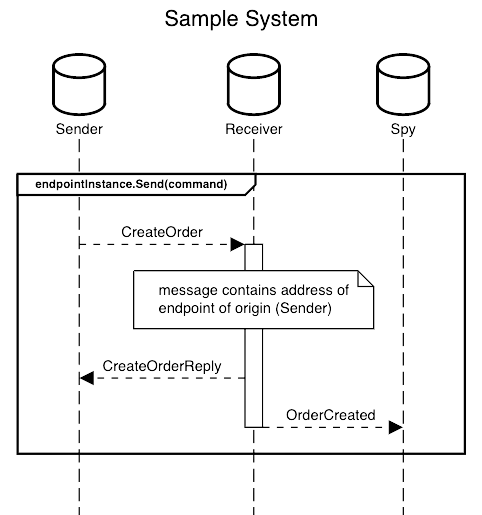
The Sender sends a command to the Receiver. The Receiver handles that command, sends a reply back to the Sender, and publishes an event that the Spy will handle. That’s the system in a nutshell. The goal is to bring to life the concepts I introduced in the previous post. We are going to create console apps for the three services. Figure 2 below show the sequence of events I just described.
Contracts
We are going to create a class library called Contracts. In this library we are going to create our messages – commands, events and replies. The library is going to be share across all the three services. Inside the Contracts project, we are going to create three folders (namespaces): Commands, Events, Messages. In the Commands folder we are going to add our command:
public sealed record CreateOrder
{
    public required Guid OrderId { get; init; }
}
We are also going to create a OrderCreated event inside the Events folder:
public sealed record OrderCreated
{
    public required Guid OrderId { get; init; }
}
And lastly, we are going to create a reply message in the Messages folder:
public sealed record CreateOrderReply
{
    public required Guid OrderId { get; init; }
}
Abstract endpoint configuration factory
We are going to create an abstract class for creating EndpointConfigurations. The EndpointConfiguration class is where we define and configure our NServiceBus endpoints. If you haven’t read the previous post and you don’t know what an endpoint is in NServiceBus, you may need to go read it. The abstract class is going to be created in a class library called Shared, which will be shared across the three services (console apps). First, we need to install all the required packages to the Shared project:
dotnet add package NServiceBus.RabbitMQ
dotnet add package NServiceBus.Newtonsoft.Json
Now we can create our abstract factory class:
using NServiceBus;

namespace NServiceBusBasics.Shared;

public abstract class AbstractEndpointConfigurationFactory
{
    private const string RabbitMqConnectionString = "amqp://guest:guest@rabbitmq:5672/";

    private readonly string _endpointName;

    protected AbstractEndpointConfigurationFactory(string endpointName)
    {
        ArgumentException.ThrowIfNullOrEmpty(endpointName);
        _endpointName = endpointName;
    }

    public EndpointConfiguration Create()
    {
        var endpointConfiguration = new EndpointConfiguration(_endpointName);
        ConfigureMessageConventions(endpointConfiguration);
        ConfigureTransport(endpointConfiguration);
        endpointConfiguration.EnableInstallers();
        endpointConfiguration.UseSerialization<NewtonsoftJsonSerializer>();
        return endpointConfiguration;
    }

    private void ConfigureTransport(EndpointConfiguration endpointConfiguration)
    {
        var transport = endpointConfiguration.UseTransport<RabbitMQTransport>()
            .ConnectionString(RabbitMqConnectionString)
            .UseConventionalRoutingTopology(QueueType.Classic);

        ConfigureTransportSettings(transport);
        ConfigureRouting(transport.Routing());
    }

    protected virtual void ConfigureTransportSettings(TransportExtensions<RabbitMQTransport> transport)
    {
        // override this method to add additional transport settings.
    }

    protected virtual void ConfigureRouting(RoutingSettings routingSettings)
    {
        // override this method if you need to configure routing
    }

    private static void ConfigureMessageConventions(EndpointConfiguration endpointConfiguration)
    {
        var conventionsBuilder = endpointConfiguration.Conventions();
        conventionsBuilder.DefiningCommandsAs(type => type.Namespace != null && type.Namespace.Contains("Commands"));
        conventionsBuilder.DefiningEventsAs(type => type.Namespace != null && type.Namespace.Contains("Events"));
        conventionsBuilder.DefiningMessagesAs(type => type.Namespace != null && type.Namespace.Contains("Messages"));
    }
}
There are a few methods I want to talk about.
ConfigureTransport
In this method we define the transport that our endpoints are going to use. In this instance, we are using the RabbitMQ transport. Again, I advise that you read the previous post if you haven’t, to understand what role transports play in NServiceBus.
ConfigureRouting
In this method, we configure routing for our messages, commands to be specific. NServiceBus commands must be sent to a specific endpoint, otherwise you will get a runtime exception. We will override this method in the Sender service since it needs to send a command.
ConfigureMessageConventions
NServiceBus needs to know which messages are commands and which ones are events. The are two ways to achieve this. The first one is to have your messages implement marker interfaces – ICommand, IEvent, or IMessage. This can be cumbersome as you will need to remember to add the interfaces to all your messages. The second approach is to use conventions. This way you will tell NServiceBus how it will find each type of message based on a rule. In this example, I used the namespaces to distinguish between the message types. The advantage of using conventions is that you define it once and as long as your messages meet the rules, everything will just work.
We are now going to create concrete classes in each service:
1. Sender
internal sealed class SenderEndpointConfigurationFactory : AbstractEndpointConfigurationFactory
{
   public SenderEndpointConfigurationFactory()
      : base("sender")
   {
   }

   protected override void ConfigureRouting(RoutingSettings routingSettings)
   {
      base.ConfigureRouting(routingSettings);

      // all commands in the CreateOrder assembly should be sent to the receiver endpoint
      routingSettings.RouteToEndpoint(
         assembly: typeof(CreateOrder).Assembly,
         destination: "receiver");
   }
}
2. Receiver
internal sealed class ReceiverEndpointConfigurationFactory : AbstractEndpointConfigurationFactory
{
    public ReceiverEndpointConfigurationFactory()
        : base("receiver")
    {
    }

    protected override void ConfigureTransportSettings(TransportExtensions<RabbitMQTransport> transport)
    {
        base.ConfigureTransportSettings(transport);
        transport.Transactions(TransportTransactionMode.ReceiveOnly);
    }
}
3. Spy
internal sealed class SpyEndpointConfigurationFactory : AbstractEndpointConfigurationFactory
{
    public SpyEndpointConfigurationFactory()
        : base("spy")
    {
    }
}
Sending a command
In the Program.cs file inside the Sender project, add the following code:
var endpointConfiguration = new SenderEndpointConfigurationFactory()
    .Create();

var endpointInstance = await Endpoint.Start(endpointConfiguration);

while (true)
{
    var command = new CreateOrder
    {
        OrderId = Guid.NewGuid()
    };
    Console.WriteLine($"Sending CreateOrder command {command.OrderId}");
    await endpointInstance.Send(command);

    await Task.Delay(3000);
}
In the code snippet above, we created an endpoint instance (see previous post for more on endpoint instances). We then send the CreateOrder command every 3 seconds.
CreateOrderHandler
In the Receiver project, we add the handler for our command:
internal sealed class CreateOrderHandler : IHandleMessages<CreateOrder>
{
    public async Task Handle(CreateOrder message, IMessageHandlerContext context)
    {
        Console.WriteLine($"Creating order: {message.OrderId}");
        await Task.Delay(300, context.CancellationToken);

        Console.WriteLine($"Sending CreateOrderReply for order: {message.OrderId}");
        await context.Reply(new CreateOrderReply
        {
            OrderId = message.OrderId
        });

        Console.WriteLine($"Publishing OrderCreated event for order: {message.OrderId}");
        await context.Publish(new OrderCreated
        {
            OrderId = message.OrderId
        });
    }
}
After creating the order, we send a reply back to the Sender endpoint and publish a OrderCreated event.
OrderCreatedHandler
We need to add a handler for the OrderCreated event in the Spy project:
internal sealed class OrderCreatedHandler : IHandleMessages<OrderCreated>
{
    public Task Handle(OrderCreated message, IMessageHandlerContext context)
    {
        Console.WriteLine($"Got notified that order was created: {message.OrderId}");
        return Task.CompletedTask;
    }
}
CreateOrderReplyHandler
In the Sender project, we need to handle the CreateOrderReply that will be sent from the CreateOrderHandler:
internal sealed class CreateOrderReplyHandler : IHandleMessages<CreateOrderReply>
{
    public Task Handle(CreateOrderReply message, IMessageHandlerContext context)
    {
        Console.WriteLine($"Received confirmation that order was created: {message.OrderId}");

        return Task.CompletedTask;
    }
}
Starting endpoint instances
We need to start the Receiver and Spy endpoint instances:
Receiver
var endpointConfiguration = new ReceiverEndpointConfigurationFactory()
    .Create();

await Endpoint.Start(endpointConfiguration);

while (true)
{
    // to keep application running. Just me being lazy :)
}
Spy
var endpointConfiguration = new SpyEndpointConfigurationFactory()
    .Create();

await Endpoint.Start(endpointConfiguration);

while (true)
{
    // to keep application running... lazy again :)
}
Docker compose
All the services (console apps) have Dockerfiles defined. You can check them on GitHub. Now we need to create a Docker compose file that will allow us to run our system. I am making assumptions that you are familiar with Docker and Docker compose and you have it installed on your machine. The Docker compose file needs to be added to the root directory. Here is the Docker compose file:
version: "3"
services:
  sender:
    image: sender
    build:
      context: .
      dockerfile: NServiceBusBasics.Sender/Dockerfile
    depends_on:
      rabbitmq:
        condition: service_healthy

  receiver:
    image: receiver
    build:
      context: .
      dockerfile: NServiceBusBasics.Receiver/Dockerfile
    depends_on:
      rabbitmq:
        condition: service_healthy

  spy:
    image: spy
    build:
      context: .
      dockerfile: NServiceBusBasics.Spy/Dockerfile
    depends_on:
      rabbitmq:
        condition: service_healthy

  rabbitmq:
    image: rabbitmq:3-management-alpine
    container_name: 'rabbitmq'
    ports:
      - 5672:5672
      - 15672:15672
    environment:
      - RABBITMQ_LOGS='-'
      - RABBITMQ_SASL_LOGS='-'
    healthcheck:
      test: [ "CMD", "nc", "-z", "localhost", "5672" ]
      interval: 10s
      timeout: 10s
      retries: 5
Our Docker compose file defines 4 services: the sender, the receiver, the spy, and RabbitMQ. Remember we are using RabbitMQ as our transport.
Running the system
Use these commands to run the system:
docker-compose build

docker-compose up
You should start seeing logs from the respective systems similar to this:
src-sender-1    | Sending CreateOrder command 8d69f10a-dc7e-4f59-b218-3a3b238cf9af
src-receiver-1  | Creating order: 8d69f10a-dc7e-4f59-b218-3a3b238cf9af
src-receiver-1  | Sending CreateOrderReply for order: 8d69f10a-dc7e-4f59-b218-3a3b238cf9af
src-receiver-1  | Publishing OrderCreated event for order: 8d69f10a-dc7e-4f59-b218-3a3b238cf9af
src-spy-1       | Got notified that order was created: 8d69f10a-dc7e-4f59-b218-3a3b238cf9af
src-sender-1    | Received confirmation that order was created: 8d69f10a-dc7e-4f59-b218-3a3b238cf9af
That’s it! You have successfully created your first distributed system using NServiceBus.
Conclusion
In this post, I showed how you can build a distributed system using NServiceBus. This post built on the previous post where I gave an overview of NServiceBus as well as its various concepts. This post brought all that theory to life. If you have any question, comment of suggestion, don’t hesitate to leave a comment below.
Comments