A simple task management app using firebase - part 4
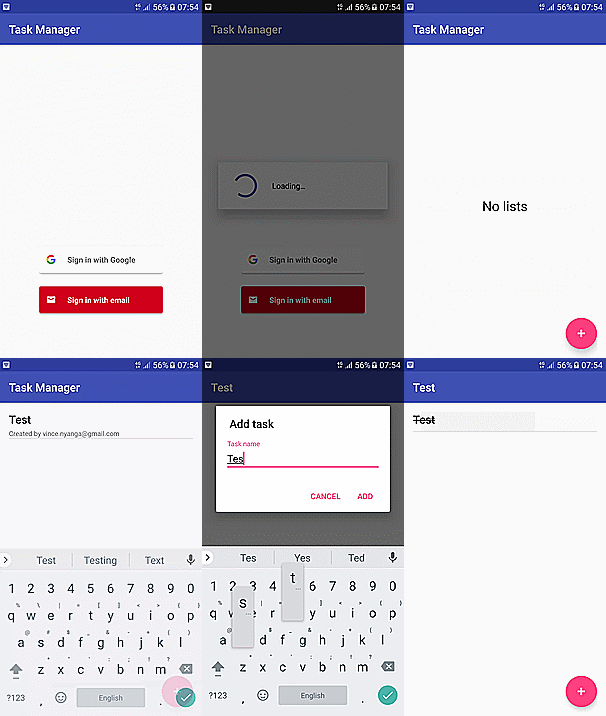
Welcome to part 4 of our series. In the previous post we remodelled our app to group related tasks in task lists. Today we are going to add user authentication so that we can secure our application. At the moment everyone with the app can see all the task lists and tasks therein which is not an ideal thing. We are going to ensure that a user can only see their tasks. By the end of this session our app will look like this:

Ok, let’s get started.
Add Firebase authentication
With your project open in Android Studio go to Tools -> Firebase -> Authentication -> Add Firebase authentication to your app. After you get confirmation that the dependencies have been set up correctly add the following dependency to your app/build.gradle: compile 'com.google.android.gms:play-services-auth:10.0.1'. Now go to your firebase console and select your project. Go to Authentication and select the Sign-in method tab. Enable Email/Password and Google.
Add Firebase UI auth library
The Firebase UI library also has an auth module that handles user authentication with email and password, Google account, Facebook account, Twitter etc. For more information check it out here. Add the following to your app/build.gradle file and sync: compile 'com.firebaseui:firebase-ui-auth:1.0.0' . At the time of writing the build would fail with the following error: Failed to resolve: com.twitter.sdk.android:twitter:2.0.0. To fix this problem add the following in your app/build.gradle file.
repositories {
    // ...
    maven { url 'https://maven.fabric.io/public' }
}
When your gradle file has successfully synced then we are good to go.
Edit TasksListsActivity
Open the TasksListsActivity.java add do the following:
1. AuthStateListener
Declare a Firebase AuthStateListener that will listen to authentication events:
 //Will use it during sign in
 private static final int RC_SIGN_IN = 22;
 private FirebaseAuth.AuthStateListener authStateListener;
Inside the onCreate() method, initialize the AuthStateListener:
 authStateListener = new FirebaseAuth.AuthStateListener() {
            @Override
            public void onAuthStateChanged(@NonNull FirebaseAuth firebaseAuth) {
                if(firebaseAuth.getCurrentUser() == null){
                    //When the use is not authenticated launch the authentication UI
                    startActivityForResult(
                            AuthUI.getInstance()
                                    .createSignInIntentBuilder()
                                    .setProviders(Arrays.asList(new AuthUI.IdpConfig.Builder(AuthUI.EMAIL_PROVIDER).build(),
                                            new AuthUI.IdpConfig.Builder(AuthUI.GOOGLE_PROVIDER)
                                                    .build()))
                                    .build(),
                            RC_SIGN_IN);
                }else {
                    loadTasks();
                }
            }
        };
        FirebaseAuth.getInstance().addAuthStateListener(authStateListener);
Now create a method loadTasks() and remove the following code from onCreate() and add it inside loadTasks():
private void loadTasks() {
        taskListsRef = FirebaseDatabase.getInstance().getReference().child("taskLists");
        adapter = new FirebaseListAdapter<TaskList>(TasksListsActivity.this, TaskList.class, R
                .layout
                .list_item, taskListsRef) {
            @Override
            protected void populateView(View view, TaskList taskList, int i) {
                TextView name = (TextView) view.findViewById(R.id.name);
                TextView owner = (TextView) view.findViewById(R.id.owner);

                name.setText(taskList.getName());
                owner.setText("Created by " + taskList.getOwner());
            }
        };

        taskLists.setAdapter(adapter);
        taskLists.setEmptyView(findViewById(R.id.placeholder_txt));

        taskLists.setOnItemClickListener(new AdapterView.OnItemClickListener() {
            @Override
            public void onItemClick(AdapterView<?> adapterView, View view, int position, long l) {
                TaskList taskList = adapter.getItem(position);
                String key = adapter.getRef(position).getKey();
                navigateToDetails(taskList, key);
            }
        });
    }
In order for a user to see only their tasks we need to create a new node in our taskLists node that will take the user’s uid as its key. To do that, edit the initialization of tasksListRef to:
taskListsRef = FirebaseDatabase.getInstance().getReference().child("taskLists").child
                (FirebaseAuth.getInstance().getCurrentUser().getUid());
This ensures that a user will be able to access only their tasks.
2. OnActivityResult
Add the following code:
protected void onActivityResult(int requestCode, int resultCode, Intent data) {
        super.onActivityResult(requestCode, resultCode, data);
        if (requestCode == RC_SIGN_IN) {
            if (resultCode == RESULT_OK) {
                Toast.makeText(TasksListsActivity.this, "Sign in successful", Toast.LENGTH_SHORT)
                        .show();
                loadTasks();
                return;
            }

            // Sign in canceled
            if (resultCode == RESULT_CANCELED) {
                Toast.makeText(TasksListsActivity.this, "Sign in cancelled", Toast.LENGTH_SHORT)
                        .show();
                return;
            }

            // No network
            if (resultCode == ResultCodes.RESULT_NO_NETWORK) {
                Toast.makeText(TasksListsActivity.this, "No network connection", Toast.LENGTH_SHORT)
                        .show();
                return;
            }

        }
    }
3. onStop()
A null pointer exception will be thrown in the onStop() method so let’s fix that:
    @Override
    protected void onStop() {
        super.onStop();
        try {
            adapter.cleanup();
        }catch(Exception ignore){

        }
    }
AddTaskListFragment
In our AddTaskListFragment.java we need to show the creator of the list. Edit the addTaskList() method to look like the one below:
private void addTaskList() {
        if(!TextUtils.isEmpty(name.getText().toString()) && getActivity() instanceof TasksListCallbackListener){
            FirebaseUser user  = FirebaseAuth.getInstance().getCurrentUser();
            String creator = user != null? user.getEmail(): "Unknown";
            TaskList taskList = new TaskList(name.getText().toString(),creator);
            ((TasksListCallbackListener)getActivity()).onTaskListAdded(taskList);
        }
    }
Database rules
Remember we changed the database rules in Firebase a couple of posts ago. We had loosened them to allow everyone to read and write to the database. Now that we have added user authentication we can go set them in the Firebase console. Go to the Firebase console and open the database rules tab in the database menu. Edit them to look like this to ensure only authenticated users can access the database:
{
  "rules": {
    ".read": "auth != null",
    ".write": "auth != null"
  }
}
More rules are going to be added in later posts.
We are done. Run the app and you will be created by a sign in screen asking you to use email or your Google account. Once you’re logged in you can start adding tasks that only you can access :).
Conclusion
In this post we added user authentication to our app. We used the Firebase UI library for our sign in flow. In the next post we will add the functionality to share task lists with friends and more database rules to make our app more secure. Thanks for reading.
Comments