
In the previous post we spoke about custom policies and how they can be used to create user journeys in Azure AD B2C. We also introduced Hones Bakery, a business that we are using as a case study during this B2C series. After successfully creating a tenant for the business and setting up custom policies for common user journeys, we are going to build onto that and talk about custom attributes.
Custom Attributes
Azure AD B2C has a number of default user attributes that it stores, such as given name, surname, address, phone number, to mention but a few. There are times when these attributes might not be enough to meet your business needs. This is where custom attributes come in. Azure AD B2C allows you to create custom attributes – up to 100 of them, that you can use to capture and store user information that you need for your business.
Creating Custom Attributes
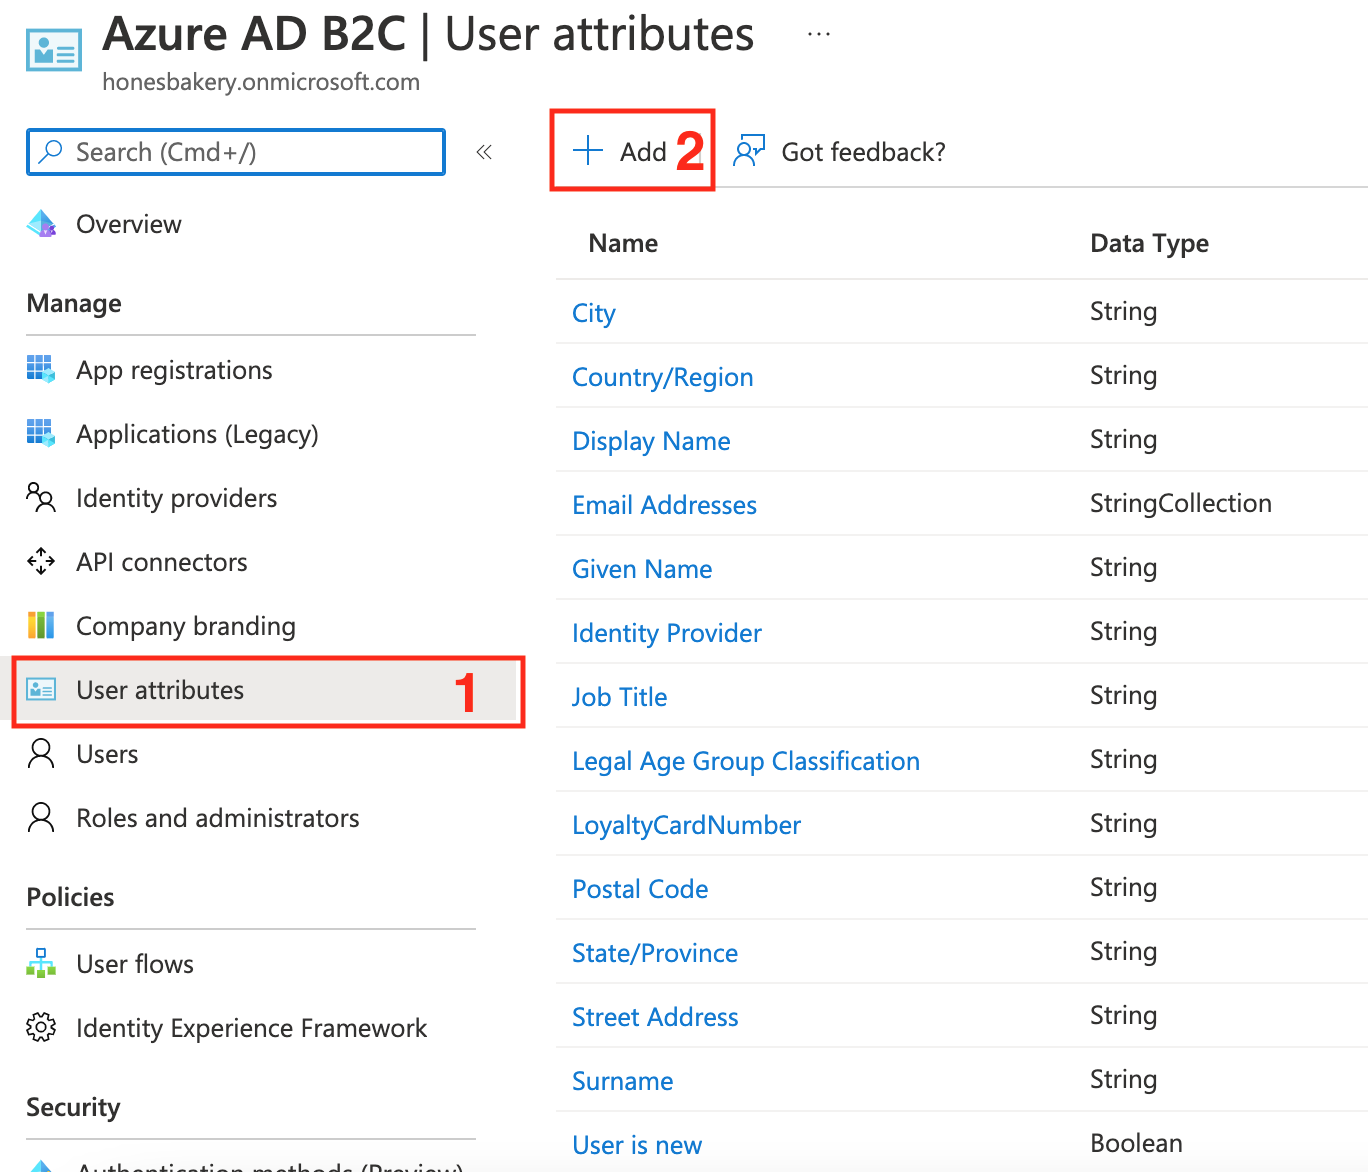
To create a custom attribute, login to your Azure AD B2C tenant and go to the User Attributes menu item. You will see a list of all default attributes and a button to add your own attribute (see Figure 1 below).
How It Works In The Background
Custom attributes are created and stored using the B2C extension application. This is an application that is automatically created when you create your Azure AD B2C tenant. If you go to your app registration tab and select all applications, you will see an application that called b2c-extensions-app. Do not modify. Used by AADB2C for storing user data. You are not supposed to modify or delete this application. When you create a custom attribute, let’s call it LoyaltyCardNumber it will be stored in Azure AD B2C as extension_<extension app client id without dashes>_LoyaltyCardNumber. My extension app client ID is 8f3907cf-cb81-4597-b32a-d719b2b5d3fa so my custom attribute will be stored as extension_8f3907cfcb814597b32ad719b2b5d3fa_LoyaltyCardNumber. However, when you refer to the custom attribute in your custom policies you have to drop the extension app client ID so it will become extension_LoyaltyCardNumber.If you want to populate a user’s custom attributes using the Graph SDK you will need to reference it using the full name (i.e including the extension app client ID). Your code will look like this:
graphServiceClient.Users.Request()
.AddAsync(new User{
        // other user attributes
    AdditionalData = new Dictionary<string, object>
    {
        {"extension_8f3907cfcb814597b32ad719b2b5d3fa_LoyaltyCardNumber", "12345"}
    }
});
Now that we have an understanding of how custom attributes, let’s go back to our case study and see how we are going to make use of custom attributes.
Case Study
Hones Bakery, the business we were introduced to in the previous post has loyalty cards for its customers. The owner of the business has requested us to allow users to add the loyalty card numbers to their profiles. We are going to create a custom attribute called LoyaltyCardNumber of type string and update our custom policies to allow for the capture and store the custom attribute.
Update Custom Policies
Assuming that you have created your custom attribute let’s go to our custom policies and get cracking. There are a few steps we are going to follow.
Add B2C Extension App Metadata
If you didn’t use the online tool to set up your custom policy you will need to add the app client ID and the object ID of the B2C extension app to your custom policies. Without this you will not be able to access your custom attributes. Remember they are stored and managed by the extension app. Open the TrustFrameworkExtensions.xml file and add the following under the ClaimsProviders tag:
<ClaimsProviders>
    <!-- Other claims providers -->
    <ClaimsProvider>
      <DisplayName>Azure Active Directory</DisplayName>
      <TechnicalProfiles>
        <TechnicalProfile Id="AAD-Common">
          <DisplayName>Azure Active Directory</DisplayName>
          <Metadata>
            <Item Key="ApplicationObjectId">b2c-extension-app-object-id</Item>
            <Item Key="ClientId">b2c-extension-app-client-id</Item>
          </Metadata>
        </TechnicalProfile>
      </TechnicalProfiles>
    </ClaimsProvider>
</ClaimsProviders>
What we are doing here is to extend a technical profile with ID AAD-Common that’s in the TrustFrameworkBase.xml policy by adding the B2C extension app metadata. Next, we define the schema for our custom attribute.
Define Schema For Custom Attribute
While still in the TrustFrameworkExtensions.xml file, go to the BuildingBlocks tag and add the following:
<ClaimsSchema>
    <!-- Add a claim to capture the loyalty card number -->
    <ClaimType Id="extension_LoyaltyCardNumber">
      <DisplayName>Loyalty card number</DisplayName>
      <DataType>string</DataType>
      <UserHelpText>Your loyalty card number</UserHelpText>
      <UserInputType>TextBox</UserInputType>
      <Restriction>
        <Pattern RegularExpression="^\d{10}$" HelpText="Enter 10 digit loyalty card number"/>
      </Restriction>
    </ClaimType>
</ClaimsSchema>
The code snippet above creates the schema for our custom attribute. As you can notice the Id is extension_LoyaltyCardNumber which is how we reference it in our custom policies. We also declared the data type, user input type and other UI related data that Azure AD B2C will require to render the UI element to capture the custom attribute. Next we are going to extend the profile update technical profile to allow for the capture of our custom attribute.
Extend SelfAsserted-ProfileUpdate Technical Profile
Still in the TrustFrameworkExtensions.xml file add the following in the ClaimsProviders tag:
<ClaimsProvider>
    <DisplayName>Self Asserted</DisplayName>
    <TechnicalProfiles>
      <TechnicalProfile Id="SelfAsserted-ProfileUpdate">
        <InputClaims>
          <InputClaim ClaimTypeReferenceId="extension_LoyaltyCardNumber"/>
        </InputClaims>
        <OutputClaims>
          <OutputClaim ClaimTypeReferenceId="extension_LoyaltyCardNumber" Required="true"/>
        </OutputClaims>
      </TechnicalProfile>
    </TechnicalProfiles>
</ClaimsProvider>
Here were adding our custom claim to the list of input and output claims inside the SelfAsserted-ProfileUpdate technical profile. The reason why we have our custom policy in both the input and output claims is that if it’s already there (in the input claims) we want to pre-populate the field and once the technical profile has completed executing we save it to the claims bag (output claims). A technical profile is analogous to a function (method) in object oriented programming. It takes in inputs (input claims), execute a given task and then return outputs (output claims). Check out the documentation for more information on technical profiles. Next we extend the technical profiles that are responsible of reading and writing user’s profile.
Update Technical Profiles To Read And Write User Data
Add the following in the ClaimsProviders tag:
<ClaimsProvider>
    <DisplayName>Azure Active Directory</DisplayName>
    <TechnicalProfiles>
      <!-- TP responsible for writing user's profile -->
      <TechnicalProfile Id="AAD-UserWriteProfileUsingObjectId">
        <PersistedClaims>
          <!-- persist custom claim -->
          <PersistedClaim ClaimTypeReferenceId="extension_LoyaltyCardNumber"/>
          </PersistedClaims>
      </TechnicalProfile>

      <!-- TP responsible for reading user data by ID-->
      <TechnicalProfile Id="AAD-UserReadUsingObjectId">
        <OutputClaims>
         <!-- return custom claim as part of user data-->
          <OutputClaim ClaimTypeReferenceId="extension_LoyaltyCardNumber"/>
        </OutputClaims>
    </TechnicalProfile>
  </TechnicalProfiles>
</ClaimsProvider>
The comments in the XML speak for themselves. We extended the AAD-UserWriteProfileUsingObjectId technical profile so we can persist our custom attribute. We also extended the AAD-UserReadUsingObjectId so it can return the custom attribute when it fetches user data. Now let’s update our SignUpOrSignin user journey.
Update SignUpOrSignin User Journey
The SignUpOrSignin user journey is the user journey that the user will go through when they are signing up or signing in to our applications. The change we want to make is as follows: when a user signs in for the second time, that is, if they are not a new user, we want them to fill in their loyalty card number before they are issued a token. This is what is called progressive profiling, where you don’t ask the user for all the information you need when they first sign up but rather ask for it in subsequent sign ins.
Go to the TrustFrameworkBase.xml and copy the user journey with ID SignUpOrSignin. Paste it in the TrustFrameworkExtensions.xml file and change the ID to SignUpOrSignInProgressive. Add the following orchestration step just before the last step (the one with Type="SendClaims"):
<OrchestrationStep Order="7" Type="ClaimsExchange">
  <Preconditions>
    <!-- If claim with value extension_LoyaltyCardNumber exists then skip this step-->
    <Precondition Type="ClaimsExist" ExecuteActionsIf="true">
      <Value>extension_LoyaltyCardNumber</Value>
      <Action>SkipThisOrchestrationStep</Action>
    </Precondition>

    <!-- If claim with value newUser exists then skip this step-->
    <Precondition Type="ClaimsExist" ExecuteActionsIf="true">
      <Value>newUser</Value>
      <Action>SkipThisOrchestrationStep</Action>
      </Precondition>
    </Preconditions>

    <!-- otherwise take user to update profile screen -->
    <ClaimsExchanges>
      <ClaimsExchange Id="ProfileUpdateExchange" TechnicalProfileReferenceId="SelfAsserted-ProfileUpdate"/>
    </ClaimsExchanges>
</OrchestrationStep>
Please ensure that the Order for the orchestration step is 1 more than the one that precedes it. In my example it follows step 6 so I made it step 7. Also make sure that your last step has order of 1 more that this step – 8 in this example. This orchestration steps checks if a claim with value extension_LoyaltyCardNumber exists. If it does then we already have the user’s loyalty card number so we skip the step. It also checks if there is a claim with value newUser which is issued when a user signs in for the very first time. If it exists then we want to skip the step as well. If both the pre-conditions are not true then we take the user to the edit profile page where they will be asked to enter their loyalty card number. Lastly, we need to update the relying party.
Update Relying Party
Open the SignUp_SignIn.xml file and make the following changes:
- Change the default user journey reference ID to
SignUpOrSignInProgressive. This will reference the user journey we just modified. - Add the following output claim to ensure that out loyalty card number will be added to the issued token:
<OutputClaim ClaimTypeReferenceId="extension_LoyaltyCardNumber" PartnerClaimType="loyalty_card_number"/>Now we upload our updated policies to Azure AD B2C. When uploading policies it is important to follow the inheritance hierarchy so we will start with the
TrustFramworkExtensions.xmlfollowed by theSignUp_SignIn.xml.
Test Policy
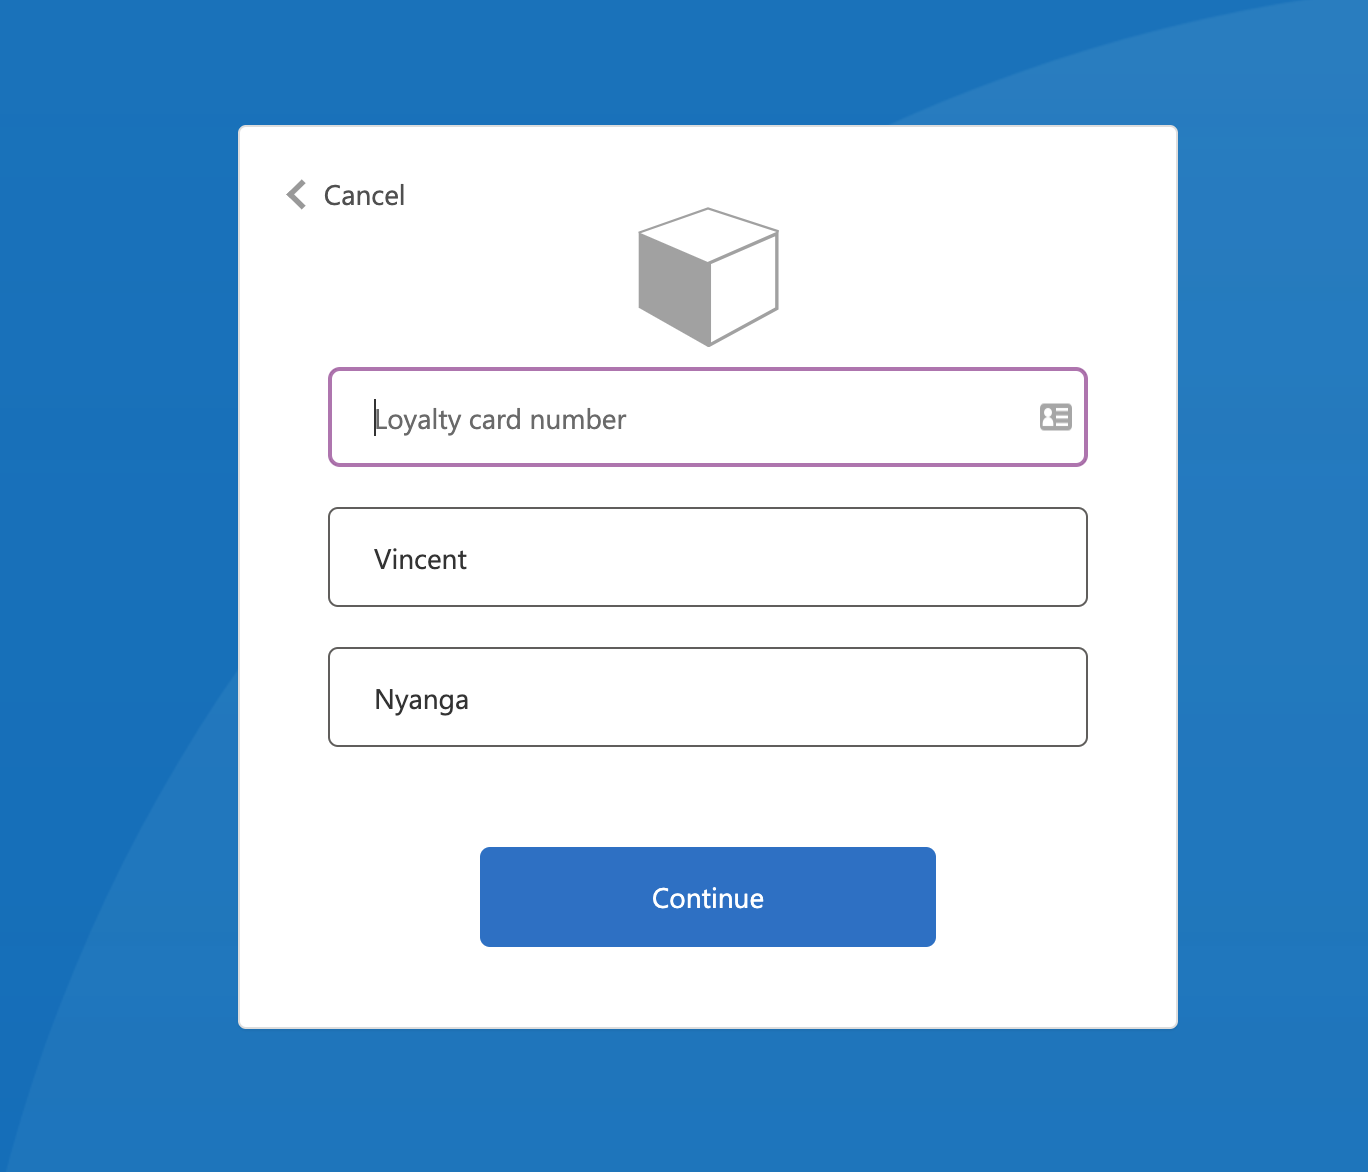
Now we test the changes we have made. Let’s run the SignUpOrSignIn policy and sign up a new user. You will notice that you were not asked for the loyalty card number. Run the policy again, and this time login with the new user’s credentials. You will be taken to a screen that asks for your loyalty card number, similar to the one below.
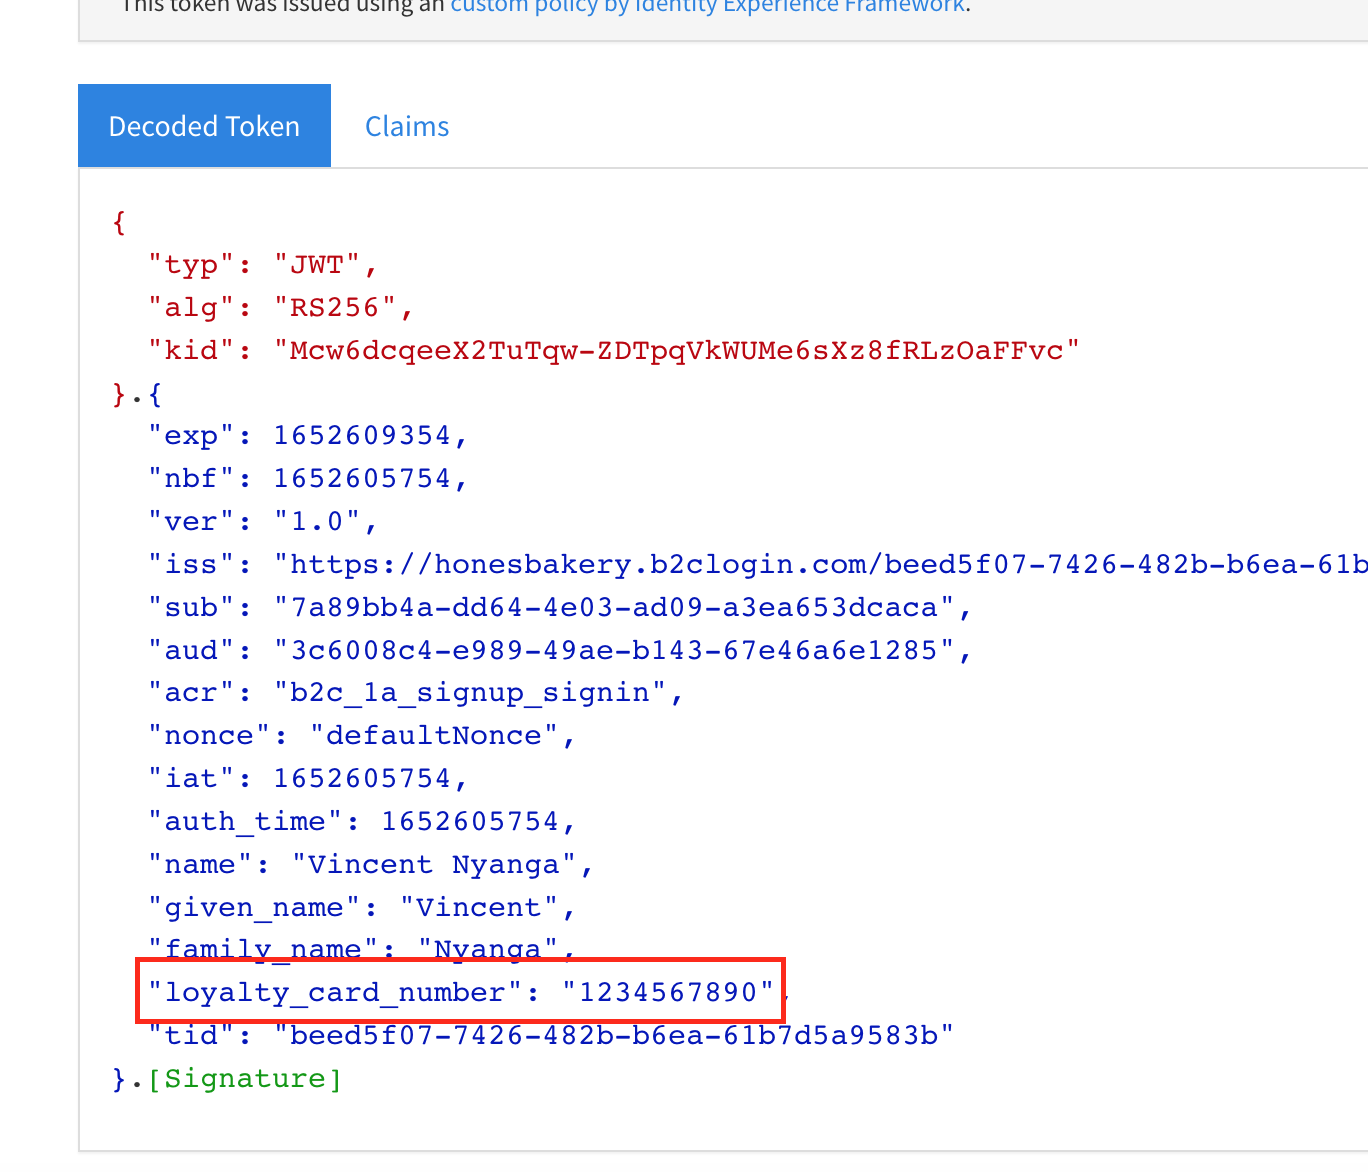
Enter a 10-digit number and you will be redirected to the jwt.ms website where you’ll view the token that includes the loyalty card number as shown in Figure 3 below.
Conclusion
In this post we spoke about custom user attributes in Azure AD B2C. We looked at how to add them in the portal as well as how they are managed in the background. We also updated our custom policies to allow us to capture the users’ loyalty card numbers after successfully logging in. In the next post we are going to look at how we can customize our UI instead of using the default UI provided by Azure AD B2C. Once again, thanks so much for reading and don’t hesitate to leave a comment below if you have any question, correction or suggestion.
Comments